Go 语言实现 Redis 字典

引言

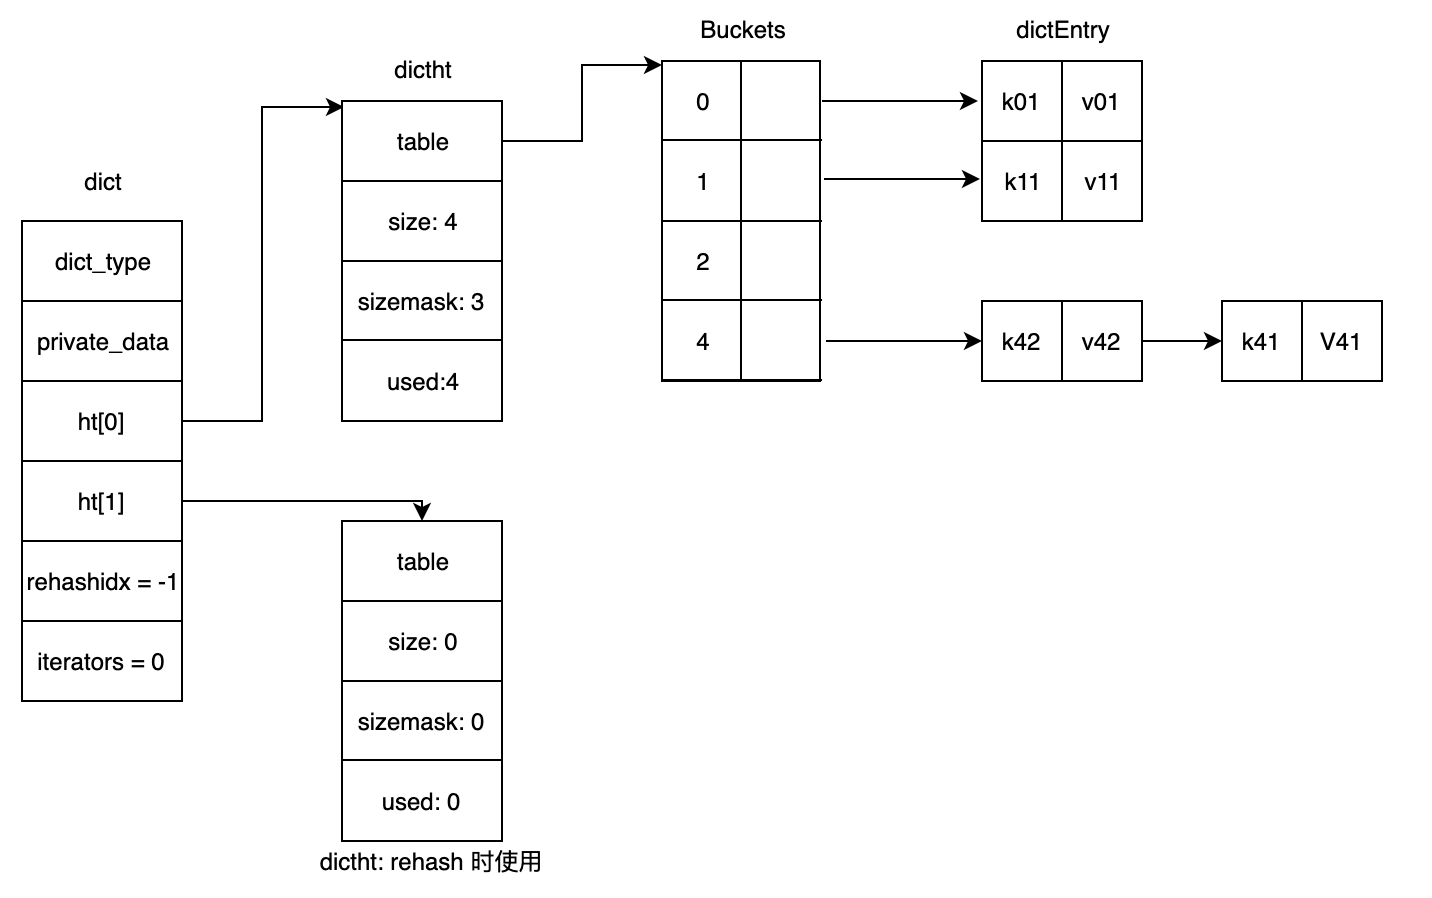
字典在 Redis 中是一个非常重要的数据结构,因为 Redis 本身就是一个键值数据库。我们先来回顾下在 Redis 源码学习之基本数据结构 中提到的 Redis 字典实现的一些特点:

  1. 支持海量 <key, value> 存储;
  2. 使用渐进式 Rehash 策略,避免因为需要迁移的 buckets 太多导致阻塞时间过久(Redis 核心处理逻辑是单线程模型);
  3. 默认使用 SipHash 算法计算键的 hash 值;
  4. 对于哈希冲突问题,采用了常见的链地址法,且新加入的节点会插入到链表的头部;
  5. 字典内部维护了两张哈希表,其中第二个哈希表会在扩容期间(Rehash)使用;
  6. 提供了安全和非安全的迭代器,方便对整个字典进行迭代。

在看了 Redis 字典源码,搞懂它的工作原理后,有没有想要自己实现下呢?所以,本文将介绍如何使用 Go 语言来山寨一个 Redis 字典实现,虽然「容貌」有异,但「内核」还是基本一致的。为了简单起见,我们在实现的时候先不考虑 goroutine 安全问题,焦点放在 Redis 字典实现的核心思想上。所以后面的实现,都假设只有一个 goroutine 在对字典进行操作。由于 Go 语言自带 GC,所以使用它来实现就不用烦心内存管理的问题了(在 Redis dict.c 实现中,还有很多代码是涉及内存申请和释放的),这样就能让我们更加容易地理解核心的实现策略。

一点说明

正所谓「入乡随俗」嘛,所以在使用 Go 语言实现的字典中,并没有照搬原先 Redis 中字典的接口,而是提供了一组类似于标准库 sync.Map 的接口。

另外,什么样的 key 可以作为字典的键呢?首先,必须要是方便计算哈希值的;其次,方便进行直接比较。我们知道在 Redis 的字典实现中提供了一组接口,供实际使用字典存储的数据类型实现。之所以这样做,也是为了更好的扩展性。

1
2
3
4
5
6
7
8
typedef struct dictType {
uint64_t (*hashFunction)(const void *key);
void *(*keyDup)(void *privdata, const void *key);
void *(*valDup)(void *privdata, const void *obj);
int (*keyCompare)(void *privdata, const void *key1, const void *key2);
void (*keyDestructor)(void *privdata, void *key);
void (*valDestructor)(void *privdata, void *obj);
} dictType;

不过为了简单起见,在使用 Go 语言实现时字典时,传入的 keyvalue 均为 interface{} 类型,并没有强制的接口实现要求。另外,针对 key 将只支持 stringint 类型及其变种。这种可以满足基本的使用场景,同时也能够拥有和 sync.Map 一样的接口签名。

最后,来看下字典的接口设计:

1
2
3
4
5
6
7
8
9
10
11
12
13
14
15
16
17
18
19
20
21
22
23
24
25
26
27
28
29
30
// Store 向字典中添加新的 key-value
func (d *Dict) Store(key interface{}, value interface{})

// Load 从字典中获取指定 key 对应的值
func (d *Dict) Load(key interface{}) (value interface{}, ok bool)

// LoadOrStore 用于根据指定 key 先查找对应值,如果存在则返回对应值;
// 否则,会将给定 key-value 存储到字典中,并返回传入的 value
func (d *Dict) LoadOrStore(key, value interface{}) (actual interface{}, loaded bool)

// Delete 删除指定的 key
func (d *Dict) Delete(key interface{})

// Len 返回字典的元素个数
func (d *Dict) Len() uint64

// Cap 返回字典的容量
func (d *Dict) Cap() uint64

// Range 模拟 Redis 字典普通迭代器行为,不支持非安全的操作
func (d *Dict) Range(fn func(key, value interface{}) bool)

// RangeSafely 模拟 Redis 字典安全迭代器行为,迭代期间不做 rehash 操作
func (d *Dict) RangeSafely(fn func(key, value interface{}) bool)

// Resize 用于调整字典容量(扩容或缩容,但是 rehash 还是渐进式的)
func (d *Dict) Resize() error

// RehashForAWhile 执行一段时间的 rehash
func (d *Dict) RehashForAWhile(duration time.Duration)

实现细节

数据结构

1
2
3
4
5
6
7
8
9
10
11
12
13
14
15
16
17
type Dict struct {
hashTables []*hashTable
rehashIdx int64
iterators uint64
}

type hashTable struct {
buckets []*entry
size uint64
sizemask uint64
used uint64
}

type entry struct {
key, value interface{}
next *entry
}

字典初始化

1
2
3
4
5
6
7
8
9
10
11
// New 实例化一个字典。
func New() *Dict {
return &Dict{
// 初始化的时候,准备两张哈希表,默认使用哈希表 1
// 在进行扩容时,会将哈希表 1 中的所有元素迁移到
// 哈希表 2。
hashTables: []*hashTable{{}, {}},
rehashIdx: -1,
iterators: 0,
}
}

在哈希表中查找指定的键

下面这个函数将基于指定的 key 计算出对应的 hash 值(使用 SipHash 算法,Redis 字典中默认使用的哈希算法),并且通过查询哈希表来确定对应的 key 是否存在于字典中。这个函数比较重要,在后面的 LoadStore 函数中都有应用,下面来看看它的具体实现吧:

1
2
3
4
5
6
7
8
9
10
11
12
13
14
15
16
17
18
19
20
21
// keyIndex 基于指定的 key 获得对应的 bucket 索引
// 如果 key 已经存在于字典中,则直接返回关联的 entry
func (d *Dict) keyIndex(key interface{}) (idx uint64, existed *entry) {
hash := SipHash(key)
for i := 0; i < 2; i++ {
ht := d.hashTables[i]
idx = ht.sizemask & hash
for ent := ht.buckets[idx]; ent != nil; ent = ent.next {
if ent.key == key {
return idx, ent
}
}

if !d.isRehashing() {
break
}
}
// 如果字典处于 rehashing 中,上面的循环可以保证最后的 idx 一定位于
// 第二个哈希表,从而保证依赖该接口的地方存储的新键一定进入到新的哈希表
return idx, nil
}

查询键值对

1
2
3
4
5
6
7
8
9
10
11
12
13
// Load 从字典中加载指定的 key 对应的值。
func (d *Dict) Load(key interface{}) (value interface{}, ok bool) {
if d.isRehashing() {
d.rehashStep()
}

_, existed := d.keyIndex(key)
if existed != nil {
return existed.value, true
}

return nil, false
}

存储键值对

1
2
3
4
5
6
7
8
9
10
11
12
13
14
15
16
17
18
19
20
21
22
23
24
25
26
27
28
29
30
31
32
33
34
35
// Store 向字典中添加 key-value。
func (d *Dict) Store(key interface{}, value interface{}) {
ent, loaded := d.loadOrStore(key, value)
if loaded {
ent.value = value // 直接更新 value 即可
} // 否则,上述函数调用会自动添加 (key, value) 到字典中
}

// loadOrStore 先尝试使用 key 查找,如果查找到则直接返回对应 entry,
// 否则,会添加新的 entry 到字典中,同时返回 nil,表示之前不存在。
func (d *Dict) loadOrStore(key, value interface{}) (ent *entry, loaded bool) {
if d.isRehashing() {
d.rehashStep()
}

_ = d.expandIfNeeded() // 这里简单起见,假设一定是可以扩容成功的,忽略了错误
idx, existed := d.keyIndex(key)
ht := d.hashTables[0]
if d.isRehashing() {
ht = d.hashTables[1]
}

if existed != nil {
return existed, true
} else {
// 否则,需要在指定 bucket 添加新的 entry
// 对于哈希冲突的情况,采用链地址法,在插入新的 entry 时,
// 采用头插法,保证最近添加的在最前面
entry := &entry{key: key, value: value, next: ht.buckets[idx]}
ht.buckets[idx] = entry
ht.used++
}

return nil, false
}

删除键值对

删除操作值得一提的是,在查找到要删除的 Entry 后,需要记得调整哈希桶的头指针,可能被删除的 Entry 恰好就是头节点。代码实现比较简单,如下:

1
2
3
4
5
6
7
8
9
10
11
12
13
14
15
16
17
18
19
20
21
22
23
24
25
26
27
28
29
30
31
32
33
34
35
36
37
38
39
40
// Delete 从字典中删除指定的 key,如果 key 不存在,则什么也
// 不做。
// 实现描述:
// 1. 遍历哈希表,定位到对应的 buckets
// 2. 删除 buckets 中匹配的 entry。
func (d *Dict) Delete(key interface{}) {
if d.Len() == 0 {
// 不要做无畏的挣扎!
return
}

if d.isRehashing() {
d.rehashStep()
}

hash := SipHash(key)
for i := 0; i < 2; i++ {
ht := d.hashTables[i]
idx := ht.sizemask & hash
var prevEntry *entry
for ent := ht.buckets[idx]; ent != nil; ent = ent.next {
if ent.key == key {
// 此时需要释放 ent 节点
if prevEntry != nil {
prevEntry.next = ent.next
} else {
// 说明待释放的节点是头节点,需要调整 buckets[idx] 指向下一个节点
ht.buckets[idx] = ent.next
}
ent.next = nil
ht.used--
return
}
prevEntry = ent
}
if !d.isRehashing() {
break
}
}
}

扩容和缩容

在给字典添加键值对时,会调用 loadOrStore 方法,而在该方法内部调用了一次 d.expandIfNeeded() 方法尝试给字典按需扩容。那么,字典扩容的时机是什么呢?扩容的策略又是怎样的呢?且看源码:

1
2
3
4
5
6
7
8
9
10
11
12
13
14
15
16
17
18
19
20
21
22
23
24
25
26
27
28
29
30
31
32
33
34
35
36
37
38
39
40
41
42
43
44
45
46
47
48
49
50
51
52
53
54
55
56
57
58
59
60
61
62
63
64
65
66
const (
_initialHashtableSize uint64 = 4
)

func (d *Dict) expandIfNeeded() error {
if d.isRehashing() {
// 此时表明扩容已经成功,正在进行迁移(rehash)
return nil
}

if d.hashTables[0].size == 0 {
// 第一次扩容,需要一定的空间存放新的 keys
return d.resizeTo(_initialHashtableSize)
}

// 否则,根据负载因子判断是否需要进行扩容
// 扩容策略简单粗暴,至少要是已有元素个数的二倍
if d.hashTables[0].used == d.hashTables[0].size {
return d.resizeTo(d.hashTables[0].used * 2)
}

return nil
}

func (d *Dict) resizeTo(size uint64) error {
// 这里主要是要保证扩容大小符合要求,至少要比现有元素个数多
if d.isRehashing() || d.hashTables[0].used > size {
return errors.New("failed to resize")
}

size = d.nextPower(size)
if size == d.hashTables[0].size {
return nil
}

// 准备开始扩容
var ht *hashTable
if d.hashTables[0].size == 0 {
// 第一次执行扩容,给 ht[0] 准备好,接下来 keys 可以直接放进来
ht = d.hashTables[0]
} else {
ht = d.hashTables[1]
// 表明需要开始进一步扩容,迁移 ht[0] -> ht[1]
d.rehashIdx = 0
}

ht.size = size
ht.sizemask = size - 1
ht.buckets = make([]*entry, ht.size)
return nil
}

// nextPower 找到匹配 size 的扩容大小
// 2^2 -> 2^3 -> 2^4 -> 2^5 -> ...
func (d *Dict) nextPower(size uint64) uint64 {
if size >= math.MaxUint64 {
return math.MaxUint64
}

i := _initialHashtableSize
for i < size {
i <<= 1 // i*= 2
}

return i
}

我们知道了扩容是何时进行的了, 但是看起来并没有在删除元素时执行缩容操作呢?那缩容会在什么时候执行呢?在 Redis 中,是由字典的使用者来确定缩容的时机的,比如在删除键值对后,或者在 serverCron 中执行(具体调用链路为:serverCron->databasesCron->tryResizeHashTables->dictResize)。该方法的实现很简单,用 Go 语言表达如下:

1
2
3
4
5
6
7
8
9
10
11
12
13
14
15
// Resize 让字典扩容或者缩容到一定大小。
// 注意,这里只是会准备好用于扩容的第二个哈希表,但真正的迁移还是分散
// 在多次 Rehash 操作中。
func (d *Dict) Resize() error {
if d.isRehashing() {
return errors.New("dict is rehashing")
}

size := d.hashTables[0].used
if size < _initialHashtableSize {
size = _initialHashtableSize
}

return d.resizeTo(size)
}

渐进式 rehash

渐进式 Rehash 的思想很简单,就是将大量的工作分成很多步完成。在上面的源码中可以看到,Load, Store, Delete 方法中,都有调用 d.rehashStep(),进而又会调用 d.rehash(1)。下面我们来看看渐进式 Rehash 是怎么实现的:

1
2
3
4
5
6
7
8
9
10
11
12
13
14
15
16
17
18
19
20
21
22
23
24
25
26
27
28
29
30
31
32
33
34
35
36
37
38
39
40
41
42
43
44
45
// rehash 实现渐进式 Rehash 策略。基本思想就是,每次对最多
// steps 个 buckets 进行迁移。另外,考虑到可能旧的哈希表中
// 会连续遇到较多的空 buckets,导致耗费时间不受限制,这里还
// 限定最多遇到 10 * steps 个空 buckets 就退出。
func (d *Dict) rehash(steps uint64) (finished bool) {
if !d.isRehashing() {
return true
}

maxEmptyBucketsMeets := 10 * steps
src, dst := d.hashTables[0], d.hashTables[1]
for ; steps > 0 && src.used != 0; steps-- {
// 扫描哈希表直到遇到非空的 bucket
for src.buckets[d.rehashIdx] == nil {
d.rehashIdx++
maxEmptyBucketsMeets--
if maxEmptyBucketsMeets <= 0 {
return false
}
}

// 把整个 bucket 上所有的 entry 都迁移走
for ent := src.buckets[d.rehashIdx]; ent != nil; {
next := ent.next
idx := SiphHash(ent.key) & dst.sizemask
ent.next = dst.buckets[idx]
dst.buckets[idx] = ent
src.used--
dst.used++
ent = next
}
src.buckets[d.rehashIdx] = nil // 清空旧的 bucket
d.rehashIdx++
}

// 如果迁移完毕,需要将 ht[0] 指向迁移后的哈希表
if src.used == 0 {
d.hashTables[0] = dst
d.hashTables[1] = &hashTable{}
d.rehashIdx = -1
return true
}

return false
}

字典迭代器

迭代器的数据结构定义如下:

1
2
3
4
5
6
7
8
9
10
11
12
13
14
15
16
17
18
19
// iterator 实现了一个对字典的迭代器。
// 不过考虑到我们将为字典提供 `Range` 方法,故该迭代器就不往外暴露了。
type iterator struct {
d *Dict
tableIndex int
safe bool
fingerprint int64
entry *entry
bucketIndex uint64
waitFirstIteration bool
}

func newIterator(d *Dict, safe bool) *iterator {
return &iterator{
d: d,
safe: safe,
waitFirstIteration: true,
}
}

在 Redis 的字典中,提供了两种类型的迭代器,分别通过 dictGetIteratordictGetSafeIterator 获得。普通迭代器只能执行和字典关联的 dictNext 方法,不允许执行 dictFinddictAdd 等操作,这主要是因为这些操作可能会引起 Rehash,从而导致在迭代期间可能会扫描到重复的键值对(比如在执行 Rehash 期间,某些键值对被迁移到了新的哈希表,但是我们是优先扫描第一个哈希表,然后再扫描第二个哈希表,而此时可能会遇到之前扫描过的元素)。当然,Redis 的普通迭代器是没法阻止你在迭代期间执行不安全的操作的,但是它会通过计算迭代前后字典的指纹信息,并在最后进行比对,若指纹不匹配,则无法通过 assert(iter->fingerprint == dictFingerprint(iter->d)) 断言。

那么安全迭代器又是如何做到可以允许 dictFinddictAdd 等操作执行的呢?其实它是通过阻止字典 rehash 实现的,正因为如此,它才可以放心大胆地扫描哈希表中的 Entries,而不用担心遇到重复的 Entries。在上面的代码中可以看到,在 LoadStoreDelete 中都有直接或间接地调用 d.rehashStep() 方法,它的实现如下:

1
2
3
4
5
func (d *Dict) rehashStep() {
if d.iterators == 0 {
d.rehash(1)
}
}

最后,我们来看看迭代器最重要的 next() 方法实现,就可以看到安全迭代器和普通迭代器的区别了:

1
2
3
4
5
6
7
8
9
10
11
12
13
14
15
16
17
18
19
20
21
22
23
24
25
26
27
28
29
30
31
32
33
34
35
36
37
38
// next 会依次扫描字典中哈希表的所有 buckets,并将其中的 entry 一一返回。
// 如果字典正在 rehash,那么会在扫描完哈希表 1 后,继续扫描哈希表 2。需要
// 注意的是,如果在迭代期间,继续向字典中添加数据可能没法被扫描到!
func (it *iterator) next() *entry {
for {
if it.entry == nil {
if it.waitFirstIteration {
// 第一次迭代,要做点特别的事情~
if it.safe {
// 告诉 dict,有正在运行的安全迭代器,进而阻止某些操作时的 Rehash 操作
it.d.iterators++
} else {
it.fingerprint = it.d.fingerprint()
}
it.waitFirstIteration = false
}

ht := it.d.hashTables[it.tableIndex]
if it.bucketIndex >= ht.size {
if !it.d.isRehashing() || it.tableIndex != 0 {
return nil
}
// 切换到第二个哈希表继续扫描
it.tableIndex = 1
it.bucketIndex = 0
ht = it.d.hashTables[1]
}

it.entry = ht.buckets[it.bucketIndex]
it.bucketIndex++
} else {
it.entry = it.entry.next
}
if it.entry != nil {
return it.entry
}
}
}

使用示例

1
2
3
4
5
6
7
8
9
10
11
12
13
func main() {
d := dict.New()
d.Store("hello", "world")
d.Store(100, 200)
fmt.Println(d.Load("hello"))
fmt.Println(d.LoadOrStore("language", "Eng"))
d.Range(func(key, value interface{}) bool {
fmt.Println(key, "=>", value)
return true
})
_ = d.Resize()
d.RehashForAWhile(1 * time.Microsecond)
}

总结

好啦,关于 Redis 字典的实现介绍就到此为止啦。相信看完上面的代码后,应该可以了解到 Redis 字典的扩容机制、渐进式 Rehash 策略,以及哈希冲突解决方案。完整的实现代码及其单元测试参见 go-redis-dict

0%