引言
经过 上一节 的学习,相信对于 Cargo、Rust API 文档编写规范、命令行工具编写都有了初步认识,没有掌握也没关系。本节将会继续深入学习和实践,我们将采用 测试驱动开发(Test-Driven Development, TDD) 的方式编写一个简单的内存 key-value 存储库,以及一个命令行工具用于接收和处理增删查命令,并且最终还要能够通过所有单元测试。
关键词:单元测试、clap 和 structopt crate、Cargo 环境变量、clippy 和 rustfmt 工具
目标:
- 学习规范的项目结构;
- 学习
cargo new/init/test/run/clippy/fmt命令; - 学习如何从
crates.io导入新的crates; - 为 key-value 存储定义合适的数据类型。
了解 TDD
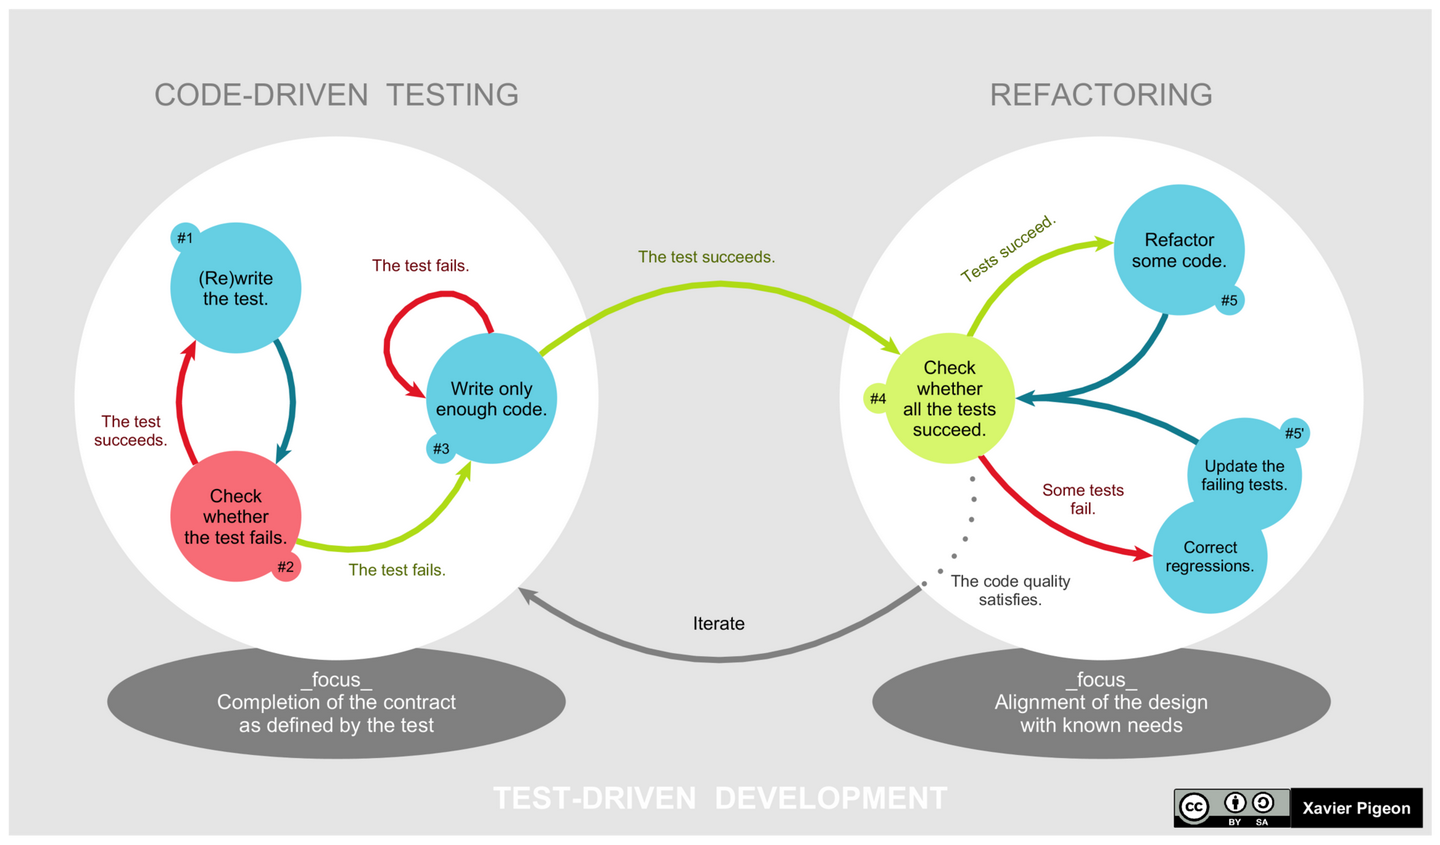
测试驱动开发(Test-Driven Development) 是一种比较有趣的软件开发模式,简单来说,就是根据需求先写好单元测试条例,然后再去编写业务逻辑,让测试通过。通过测试驱动软件开发推进,一方面可以保证我们编写的代码满足需求,另一方面也能增强我们的信心,充足单元测试也有助于代码重构,避免出现核心逻辑变动而导致 Bug。
在 Test-Driven Development by Example 中给出了 TDD 的基本流程:
- 为新功能编写测试;
- 运行所有测试,查看新功能相关测试是否失败;
- 编写代码;
- 运行测试,如果没有通过测试,则回到上一步继续修复代码;
- 重构代码;
- 不断重复上述流程。
需要注意的是,再次运行所有测试前,最好每次变更的代码不要太多。这样一旦有测试失败,可以快速定位问题,并进行修复或者回滚。
命令行和接口约定
本节会创建一个名叫 tinkv 的项目,包含一个名为 tinkv 的命令行客户端,将会调用 tinkv 库中提供的方法(和命令行客户端打通放到后面小节介绍)。
tinkv 命令行客户端需要支持如下操作:
tinkv set <key> <value>:设置 String 类型的 key value 到存储中;tinkv get <key>:查询指定 key 对应的 String 值;tinkv rm <key>:删除指定的 key;tinkv -V:打印程序的版本号。
tinkv 库中定义了一个 KvStore 类型,封装了存储服务的操作,需要支持如下操作:
KvStore::set(&mut self, key: String, value: String)KvStore::get(&self, key: String) -> Option<String>KvStore::remove(&mut self, key: String)
动手实践
创建项目
使用 Cargo 新建项目 tinkv。
1 | $ cargo new tinkv |
然后创建 src/bin/tinkv.rs, src/lib.rs 和 src/kvstore.rs 文件,还有一个存放测试的文件 tests/tests.rs。最终的目录结构如下:
1 | . |
紧接着,我们在 src/bin/tinkv.rs 中创建一个简单的 main 函数:
1 | fn main() { |
在 src/kvstore.rs 中新增 KvStore 类型:
1 |
|
然后在 src/lib.rs 中导出 KvStore 类型,这样可以在测试以及 src/bin/tinkv.rs::main() 中使用:
1 | mod kvstore; |
最后,我们完善下 Cargo.toml 中 [package] 部分:
1 | [package] |
添加单元测试
按照 TDD 的方式,我们需要先完成新需求对应的单元测试编写,不过现在已经为你准备好啦,所以请到 tinkv/tests 中将所有测试复制到本地 tests/tests.rs 文件中。
仔细阅读测试文件,可以发现有两类测试:
cli_*是针对命令行客户端的测试;get_stored_value等是针对tinkv::KvStore的功能测试。
1 |
|
单元测试某种意义上也是文档的补充,它清晰描述了某个接口的行为,而我们只需要实现那个行为即可通过单元测试。所以后面的我们的任务便是逐个通过单元测试,完成功能开发。
安装测试依赖包
现在,我们来运行下测试看看会发生什么(不用多想,一定会失败,重点是找到原因),运行 cargo test 结果如下: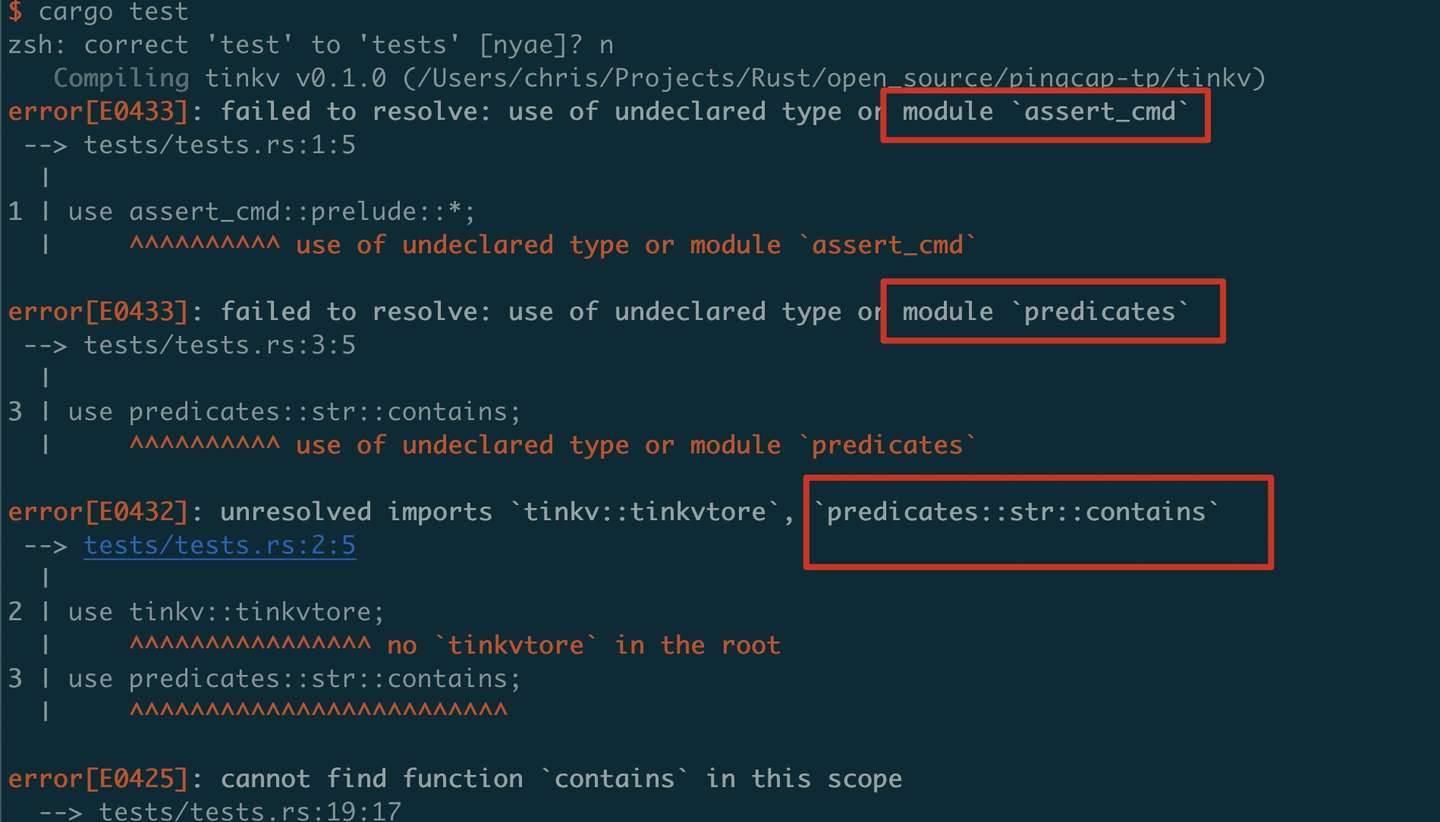
果不其然,看起来 assert_cmd, predicates crate 无法导入,这时我们需要编辑下 Cargo.toml 添加一下测试需要的依赖包:
1 | [dev-dependencies] |
然后,我们再次运行 cargo test 看看效果,看起来还是失败了嘛,不过这次报错的原因是我们还没有给 tinkv::KvStore 实现 get, set, remove 方法呢。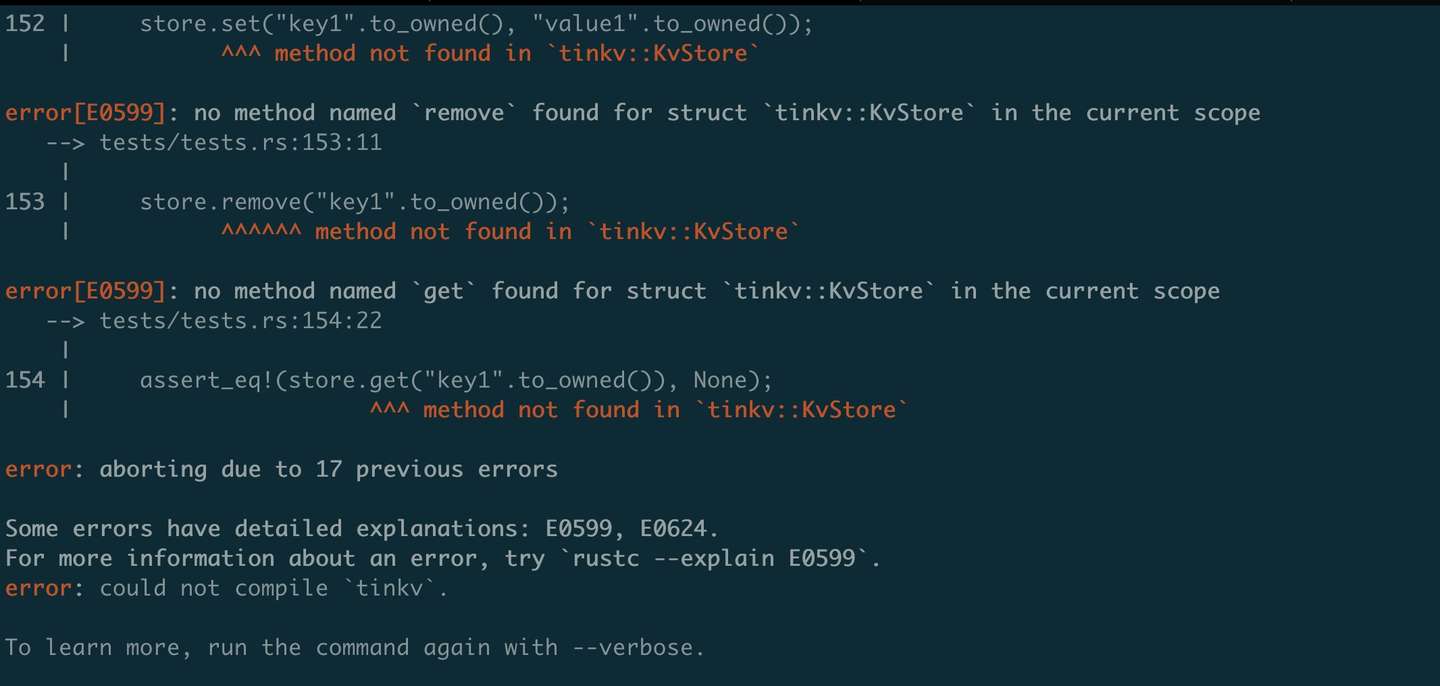
编写 KvStore
当前的目标是让测试跑起来,至少不要编译失败,也就是要让 cargo test --no-run 能够正常运行起来。从上面的报错看到 tinkv::KvStore 还缺少必须的方法定义呢,不过我们目前先完成框架,即函数定义,实现细节先用 panic!() 替代(当然,我们也可使用 unimplemented!(),不过 panic!() 字数更少,在这种场景下用得更多)。
添加函数定义如下:
1 |
|
好啦,这时再执行 cargo test 后可以发现已经可以编译通过,并能运行单元测试了(虽然都挂了,但至少编译通过了,可喜可贺)。
关于 cargo test 使用提示
细心的话,可以看到测试输出中有这样的提示:
1 | running 0 tests |
看起来是运行了三次测试嘛,这是因为 cargo test 默认会在如下几个位置查找并运行测试:
- 库源码里面;
- 每个二进制文件的源码中;
- 每个测试文件;
- 库文档测试。
不过我们可以通过添加额外的参数,指定运行测试,选项如下(详细可以通过 cargo help test 查看):
cargo test --libcargo test --doccargo test --binscargo test --bin foocargo test --test foo
通常我们在实现某个接口功能时,可以只运行对应的测试,方式如下:
1 | 仅运行名称为 cli_no_args 的测试函数 |
编写命令行客户端
在之前的小节中,我们已经学习了如何使用 clap 来创建一个 CLI App,也演示了通过 cli.yml 配置或者在代码中使用 clap 提供的构造函数生成命令行应用的方式。但是存在两个问题:
- 生成
clap::App时,需要编写很多样板代码,比较啰嗦; - 在处理命令行参数时,使用
matches.value_of("arg")的方式拿到值后,可能还涉及到类型转换等操作,也同样会产生很多样板代码,不够优雅和高效。
本节将会引入一个新的 crate structopt,我们将命令行参数通过结构体成员变量表示,参数类型、帮助信息等编写起来都很轻松,它使用 Rust 宏来帮助我们生成 clap::App,同时可以自动完成参数类型转换,非常灵活。
首先,使用 cargo add structopt 添加该依赖指项目中,然后在 src/bin/tinkv.rs 中配置命令行参数对应的结构体,并根据单元测试的预期行为实现命令行程序如下:
1 | use std::process::exit; |
此时,使用 cargo test --tests cli 运行所有和命令行有关的测试,不出意外的话,应该会全部通过。
1 | $ cargo test --tests cli |
将数据保存到内存中
简单起见,我们使用 HashMap<String, String> 保存设置的数据到内存,让单元测试通过。具体实现比较简单,不再赘述。
1 | use std::collections::HashMap; |
至此,运行 cargo test 后,所有的测试用例应该都会通过了。
1 | $ cargo test |
规范文档
在上一节中已经提到如何规范编写 API 文档了,本节不再赘述,但是需要强调的是文档非常重要。在 Rust 标准库以及一些优秀的第三方 crates 中,通常会在代码中看到非常丰富且规范的文档,建议多多阅读。
这里需要提几点:
- 在编写好文档后,一般可以通过
cargo doc --open在本地浏览器查看 API 文档(生成的文档位于target/doc目录下); - 可以使用
cargo test --doc对文档中的示例进行测试; - 在
src/lib.src顶部添加#![deny(missing_docs)]会强制所有公开的类型、函数等必须编写文档,否则编译失败。
所以,在完成代码编写后,一定要添加上规范的文档哦~
clippy 和 rustfmt
clippy 和 rustfmt 是 Rust 工具链中两款重要的工具:
clippy会检查到代码中不够优雅或者可能会导致错误的模式,并会给出修改建议;rustfmt则会格式化代码,保证代码风格一致。
这两个组件默认没有安装,需要通过下面的方式安装:
1 | rustup component add clippy |
安装后,可以通过 cargo clippy 和 cargo fmt 分别调用它们。强烈建议在提交代码前,先运行 cargo clippy 将建议修改的地方修改好,然后使用 cargo fmt 格式化好代码后再提交到主干。
小结
本节以实践为主,采用 TDD 方式逐步完成了一个简单的内存 key-value 存储库以及一个命令行客户端,并最终通过了所有单元测试,在最后再次强调了文档规范以及代码风格统一、程序健壮的重要性。本节涉及的完整的源码参见:tinkv_v0.2.0。